This set up guide is to walk you through setting up a VLAN on multiple SSIDs using an AP (Access Point) plugged into a Switch, or a router and use firewall rules to block access from one network to another. I am writing this guide because there is not a guide that I found that contains all the information from start to finish. Hopefully this will save folks time in getting everything set up quickly. Let’s get some basic terms understood first.
AP – Access Point. AP’s are typically configured as an AP, and plugged into a switch. A router can be made into an AP by changing the mode to AP in the router settings. The AP has its own IP address just like a computer on the network. The AP can be powered “Power over ethernet” PoE as well. This is how most corporate and business’s are set up. A typical home set up might have a router with wifi built in, and the router operates as a router and switch. The advantages of using a router in AP mode, or purchasing an AP device is you can expand your network throughout the entire house/property simply by running a cable from the router, upstairs and connect an AP. This is a much better set up than buying a mesh wifi set up. The only draw back is you need to run an ethernet wire from where your router is, to the next floor or basement depending on where your equipment is. Ideally you want your internet with the router to enter the house into the basement, via media closet, then each room in your home would have an ethernet cable which you can then install more switches or AP’s. See my blog article on designing the optimal home network for all you Network DIYr’s
VLAN – Virtual Local Area Network. A way to segment networks into their own IP ranges and subnets. VLANs can be created to isolate network access between departments, or to isolate IoT (Internet of Things) devices like wifi thermostat, Alexa, Google devices, automated door locks, cameras, anything you add to your wifi network. There is plenty of information online and youtube explaining how VLANs work, feel free to look those up to learn more.
SSID – Service Set Identifier (Wifi network). An SSID is your wifi network. Multiple SSIDs can be created on a single AP or router with different names and passwords. SSID’s have Guest networks which also segment network access to other computers and devices, but using a guest network does not create separate networks using IP/Subnets. But may use NAT (Network Address Translation) or forwarding to grant access to the internet.
Router – A device that your Modem plugs into, the Router will then distribute the internet to each device using an IP Address. This also protects your network from the outside. Your router will provide a private IP range for your computers to use which are not accessible outside the router
Modem – A modem is what receives the internet from your ISP (Internet Service Provider). A cable, phone line or fiber cable will connect to your router from the modem. The modem holds the public IP address which is accessible over the internet.
The idea of creating VLANs to segment the network, is to protect the home network, NAS devices, computers, servers etc.. while the other IoT’s (Internet of Things) devices like wifi thermostat, Alexa, Google devices, automated door locks, cameras are on another network. The thought is these devices could be hacked and compromised, and could take over your home automation, collect data on your home network such as computer names, shared drives, printers, mobile devices names, IP addresses etc. With data privacy concerns in today’s world, you want to protect it no differently than locking your front door at night. You may think this is not a big deal, but lets take an example. You have a party and several of your buddies come over, they bring a few of their buddies that you’ve never met. By default you’ve always given your buddies access to your wifi, you clack your phone with another persons phones to share the wifi password and now they have access to your network just like any other computer in the house. Let’s say you had a NAS device or shared files (shared folder) on a computer with all your important computer files, or your personal computer with shared drives on the same network and the security permissions were not set properly, or “everyone” access was configured. With everyone accessing the same network, this could expose your private files, financial data, family photos to everyone on the network simply by clicking on the computer drive or network path. Even worse they could be deleted by anyone with access. Other examples include other computers on the network can see other computers on the same network. You may think this is not really a big deal, however open up My Computer, then Network and see all the shared computers and drives from other computers in your household. When one computer is connected to a network, anything on the network that is accessible, or at least is visible like shared drives, printers, network drive mappings, and other device names are cached in the Windows registry. You may not want these names cached on a work computer, or other friends computers. Example, when connecting your work laptop to a wireless network, that name is now stored in the computer. You can see this by navigating to Wifi settings in Windows 11, then “Manage Known Networks”. This will show you the names of every wifi network the computer has been connected to. You wouldn’t want your company IT department seeing the last Wifi network you connected to was “My Lovin Wifi”, “50 Shades of WiFi” or “Sexy Mum & Dirty Dad”. Quoting some of the funny wifi names found on the internet. Navigating to the registry to HKEY_CURRENT_USER\Network, you can see IP address, shared drives etc. HKEY_CURRENT_USER\Printers will show any printer you’ve connected to or used.
Creating the VLAN
Start by logging into the Router and create a VLAN. There are plenty of resources online how to do this for the model of your router. In this example we will use EdgeRouter 4
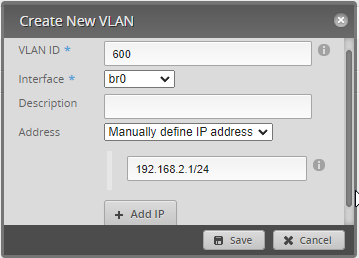
On the main Dashboard Tab, click VLAN, then Add Interface, then , Add VLAN


Use any VLAN number, in this example its 600. You may create multiple VLANs with different VLAN ID’s. You may have 200, 300, 400, 600, 800 VLAN ID’s, or 10, 20, 30 etc. doesn’t matter. Each VLAN ID will be a different network.
Create a new IP subnet. 192.168.2.1/24 . For additional networks, use this IP Subnet Calculator to determine how you want to configure your network. Using CIDR notation (/24) you’ll define how many computers can be on the network. /24 with Class C can contain 254 usable hosts. Ensure you create enough hosts. This way as you add smart devices to the network you won’t run out of IP’s. The interface will be your LAN interface, which could be something other than eth0. You may have the ISP modem plugged into eth0, then eth3 or a bridge going to your LAN. Examples of different networks could be 192.168.1.1 or 192.168.2.1 or 192.168.10.1
Click on the Service Tab, then DHCP Server tab, then Add DHCP server

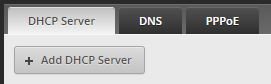
Add a name, Subnet, range start and stop, DNS should point to the router (192.168.2.1), another DNS can be 1.1.1.1 for Cloudfare, or use another provider (OpenDNS, Google etc..)

Now the VLAN and DHCP Server is set up. Everything should be configured on the router at this point, other than the firewall rules which you’ll need to configure to block access from the VLAN to the home network. Repeat these steps for each VLAN network you want to create. Use a spreadsheet or notebook to document the VLAN IDs you’ll create, along with the IP ranges and DHCP. It will make everything easier.
Access your switch via IP address. If you don’t know what it is, use the discovery tool that most vendors of your hardware have. Just search online for your vendors discovery tool.
Follow the directions for your hardware, but the concept is the same for most. EdgeRouter4 and Netgear Smart Managed switch is decent home office/small business hardware. When you get into the Cisco or other high end equipment, the steps will be pretty much the same, but could be more difficult to set up due to the configuration or having to access the hardware over SSH.
Summary of the next steps
- Identify the ports for the VLAN (AP devices, computers etc..)
- Add PVID and VLAN to the ports
- TAG the uplink with T which allows the internet to come through to the VLANs and the home network
Find the VLAN options, create VLAN 600. You can see this example is a Netgear.

Identify the ports on the switch that have the AP devices or computers plugged into. If you have larger network it may be difficult to find. Taking a picture of the lights, then unplugging the AP, then comparing the picture you should be able to see which light goes off

Take notes of the ports that contain the AP device, and or computers that you want to configure the VLAN for and navigate to VLAN Membership. Change the VLAN ID to 600 (in this screen shot I have VLAN ID 80). Take time to label your hardware if needed.
Change the ports to T for Tagged. Port 7 and 19 in this example have two AP devices, port 25 is the uplink that goes to the Router. When using multiple VLANs, the uplink should be included in each VLAN configuration by marking it as a trunk (T). The other ports can be U for untagged, or T for Tagged, depending on your configuration.

Take note of this screen shot showing VLAN 1. Remember that VLAN ID 1 is the default and in order to isolate access from the home network (Assuming its on VLAN ID 1), you’ll need to untag all the ports that you do not want access to VLAN 1. So VLAN 1 includes all the ports except 7, 19, 6. port 25 is the uplink, and I’ve just left it untagged for VLAN ID 1. The other ports I have it as TAGGED.

Now navigate to PVID Configuration, you can see how the permissions to the VLANs are set up. port 6 is a member of VLAN 60, with a PVID of 60 and is forbidden to access VLAN 1 and 10. Port 7 and 19 is the AP devices and is a member of VLAN 80 and port 25 is the uplink and is a member of VLAN 1,60,80. Remember that these ports are “members” of the VLAN IDs. When a request is sent from a computer on a VLAN, the traffic is tagged with that VLAN ID and this is how it keeps the network separated. VLAN traffic for VLAN ID1 will not be able to hit VLAN 60. Think of it as a highway you drive, that is the traffic stream with all the cars driving down the road, and the exit ramp is coming up, lets say there are various types of vehicles on the road, trucks, cars, SUVs, electric vehicles. The exit ramp is coming up but the sign says “trucks only”, therefore the trucks exit and other vehicles cannot use that exit ramp. The next exit might be for SUV’s. This is a basic concept of VLANs and basic routing.
Other notes
PVID are not needed as Tags if the ports are marked at T. This would be the uplink port 25 in this example, you can see there is no PVID of a specific VLAN. PVID’s can be any number but its suggested to use the VLAN ID to keep things organized. You can experiment with using Untagged and Tagged ports. If you experience connection issues, its most likely using T or U and this screen in the switch.

Now that you have the switch set up, and the router configured. The last thing to do is create firewall rules to block access. A few things to keep in mind.
If accessing your smart devices over the internet using the native App, you would still be able to communicate to it from your phone on a different network/VLAN because you are sending the request out to the internet and back in. If you use HomeAssist or other smart home technology like Alexa, Google, Apple Home Kit, there will be more configuration needed because you are accessing all of the devices on one IP address network and any local communication to those devices may use the LAN and not the internet and could be blocked. I haven’t tested this, but if everything goes out to the internet and back in, which is likely does, there shouldn’t be a problem.
Creating the multiple SSIDs (Multiple wifi networks)
Log into your AP device or Router and access the Wifi Settings. You should have the ability to create another SSID, or enable a Guest Network. If you choose to use the Guest Network in the router, you may not need the firewall rules below, but it may not be 100% blocked from one VLAN to another if you aren’t using Firewall rules. The built in Guest network will still give the computer the same IP network of other household computers, but it will limit access to other devices. You can go with this option to simply everything. Just test to make sure.
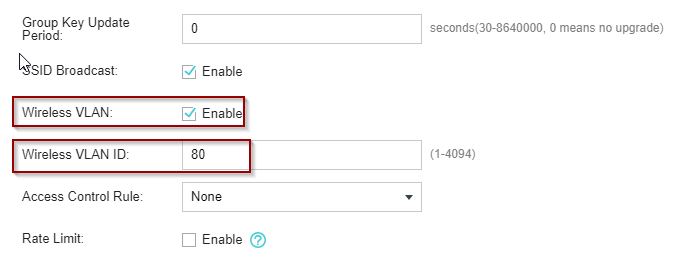
When creating the SSID, give it a name, then under the Advanced wireless settings you should see the option to add a VLAN. Type in the VLAN 600 that you created earlier.
Here I have the Guest network off, and I am just creating a new SSID with a new password

Showing the VLAN as enabled, and VLAN 80 in this example.
Save all the settings and you should now see this wifi as a network to join. See my blog on creating one SSID with multiple AP’s, using the same password with alternate radio channel settings for the most optimal wifi configuration for your home! Navigate around your house and property as your device will connect to the nearest/strongest wifi signal.
Creating the firewall rulesets
Create 2 Firewall Rulesets one for IN and one for LOCAL - this is how the EdgeRouter 4 displays the rules. We will start with the first one called VLAN60_Isolation which will have two rules. Accept and drop rules within. Click on the Actions then Edit, or Add Ruleset

Use the interface you set up when creating the VLAN earlier, use IN

Configuration Tab

Now Save the rule set, and go back in, choosing Actions–> Configuration, then Add New Rule and name it “Allow/Established Related”
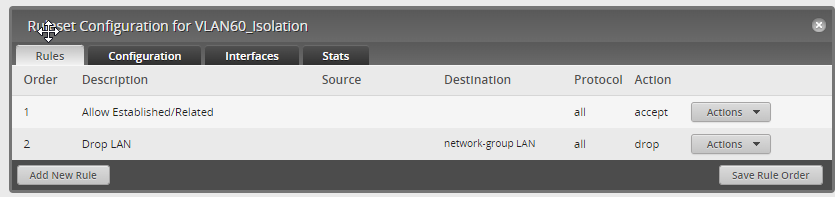
Go back into the rule, Actions–>Basic then For the First Rule, Basic Tab, Enable then Accept, All protocols
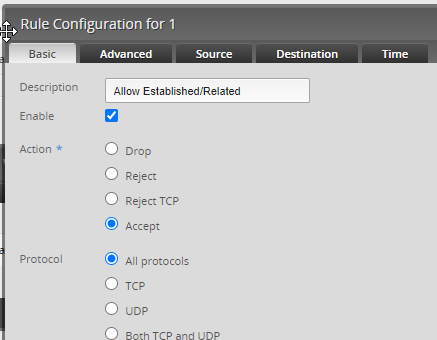
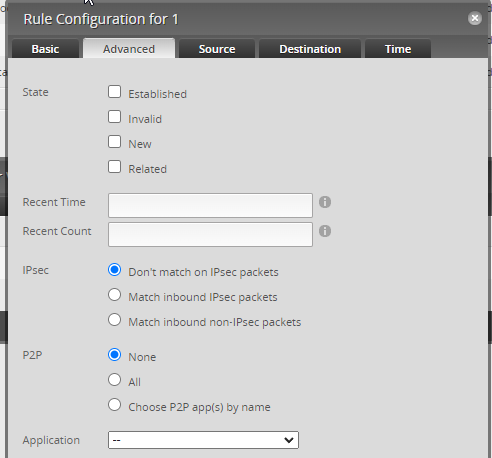
Click Advanced Tab, then save.

Create a second rule named Drop Lan using the Add New Rule button, then Actions–> Basic Tab

Advanced Tab

Destination Tab – This is where you are blocking the access from one IP to another. Keep in mind that VLANs can still access/ping other VLANs, if the goal is to block all communication, add a Network Group first (Firewall/NAT Groups tab, then Add Group and type in the IP address of your home network you want to protect). Then on the access rule you use the Network Group drop down for the Drop rule. You could create one group with multiple networks then use those groups in the firewall rules.

The second Ruleset which will have two rules. One for DNS and one for DHCP


The first one Allow DNS Basic tab

Advanced Tab
Destination Tab with port 53

Create another Rule named Allow DHCP just like above with the same settings, but use port 67. Save everything, rule order, rules etc. You should have two Rulesets with 2 rules within them.
At this point everything should be saved and tested. If done correctly you can try to ping the home network router on another PC connected to the VLAN either through the new SSID you set up, or direct ethernet connection and there shouldn’t be any replies. If you can still ping the home network, then check that the rules are set up correctly.
If the internet is blocked and your computers are not getting an IP address from the VLAN DHCP you set up earlier, its most likely a problem with the TAGGED and UNTAGGED port configuration. Ensure you have included the uplink port (the port connecting the switch to the router). If that is not included (Usually included as T, taggged in the switch), then your VLAN is not able to get back to the router to receive an IP address.
Leave a comment or question for any clarity!
Resources
https://kb.netgear.com/30611/How-do-I-create-multiple-SSID-s-to-operate-on-multiple-VLAN-s
